How to get started bushwalking

I meet many people who would like to take themselves or their family on outdoor adventures, but they’re not sure how to get started bushwalking. In this article, I’ll outline some simple steps you can take to get started, stay safe, and have loads of fun! Keep your eyes open for a whole series of articles on places you can bushwalk across South East Queensland and beyond.

What equipment do I need to go for a bushwalk?

The basic equipment is really quite simple:bushwalking boots
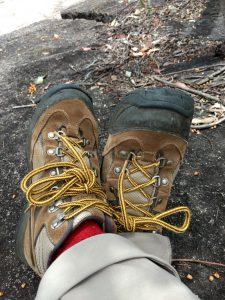
  • a comfortable and sturdy pair of covered shoes
  • a drink bottle,
  • a hat, and
  • some sun protection such as sunscreen and sun-safe clothes
  • basic first aid and medical supplies for yourself or your group such as an asthma puffer and snake bandage – I slip a snake bandage into my pocket or backpack even on short walks
If you’re bushwalking in cold or alpine areas, you’ll also need:
  • warm layers of clothing eg jacket, beanie.
And if the weather is damp, you might like to have:
  • a rain coat or poncho
What else do I need to think about for longer or more challenging walks?

As you become more experienced, you might like to go on longer or more challenging bushwalks, so it’s important to have:

  • well-fitting shoes and socks suitable for the terrain and the climate
  • a small backpack that can hold all the gear you’ll need for an awesome day out – snacks, water, extra layers of clothing, raincoat, maps, emergency devices, and a camera,
  • some people like to wear gaiters to protect against snake bites and prickly plants
What about overnight hikes and camps?

If you plan on a multi-day bushwalk you’ll also need to have:bushwalking and camping

  • a well fitting backpack large enough to hold your gear, especially if you plan to be self-sufficient,
  • a shelter such as a tent,
  • food for the duration of your expedition
  • enough water plus a bit extra to get you to your next water supply – this includes water for drinking, cooking and cleaning,
  • a water purification system if you plan to collect water from untreated water supplies,
  • a sleeping mat,
  • sleeping bag,
  • toiletry items,
  • a trowel and toilet paper,
  • extra clothes to sleep in or if you want a clean set of clothes for your second day,
  • a stove and cooking equipment,
  • maps and navigation equipment such as a compass and / GPS, and
  • emergency communication equipment such as an emergency beacon, EPIRB, or GPS communication

We’ll cover equipment for overnight hikes in more detail in a future article.

How much water will I need?

The amount of water you need to take depends on lots of things including how far and how long you’ll be bushwalking as well as the temperature and humidity, whether there is drinking water available along the way, how strenuous your walk is, and how much you as an individual need to drink. A very rough guide is usually a minimum of 2 litres per day, however I’d recommend more than that especially if the weather is hot, and just in case you stay out longer than planned. If you’re planning to cook, you’ll need extra as well.

How much food should I take on a bushwalk?

If you’re going for a short walk (less than an hour), you generally won’t need to take food. bushwalking food
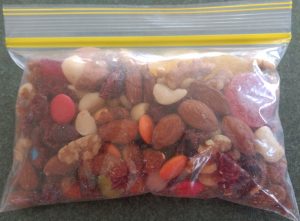
However, I think every walk is much more fun when you stop for a little picnic along the way. Choose food that won’t easily spoil or be squashed. It also pays to think about how heavy your snacks are and take a bag or container to transport your scraps back home.

Where can I go bushwalking?

Popular public walking spaces in Australia can be found in regional or council parks, state reserves and forestry, and in national parks. There also some privately owned land holdings that are open to the public. You can search the Internet for what’s available in your local area. Regional tourist information sites and centres also provide this information. Australian walking trails are often classified according to levels of difficulty from Class 1 to Class 5. This makes it easier for you to plan the right type of walk for your group.

In future articles I’ll share some of my favourite places with you.

How much does it cost to go bushwalking?

Most walking trails in Australia are free, however there are some parklands that require you to purchase a permit for vehicle entry (such as some national parks in some states). And you need to book ahead and pay an entry fee for some multi-day walks which assists with managing and maintaining the trails and surrounding environment.

Is it safe to go bushwalking alone?

Walking solo can be a great experience if you are properly prepared. I’d recommend:

  • Tell someone where you are planning to go and when you expect to be back, and then make sure you let them know you’ve arrived home safely afterwards.
  • Be extra careful about preparing and packing for your walk because you only have yourself to bushwalking equipmentrely on.
  • Take some extra water and food, as well as first aid supplies.
  • Stick to trails that are within your level of expertise.
  • Take a phone but don’t rely on having mobile coverage everywhere. (Remember you can use your phone’s GPS to help you work out where you are even if you don’t have phone coverage. The GPS function uses a satellite system not a mobile phone system.)
  • Download navigation and emergency services apps and practise using them before you go! Some suggestions include:
    • Orux Maps
    • GPS to SMS
    • Emergency+

How can I meet other people to bushwalk with?

Here are a few ways to meet other people who like to bushwalk:

  • join a bushwalking club
  • look on Facebook and MeetUp for bushwalking groups and activities
  • find a professional guide who can lead you on an organised walk
  • ask about walking groups and organised activities at tourist information centres and national parks offices
  • say hello and strike up a conversation with other people you meet along the trails – you’ll be surprised how much information other people have!

So there you have it – a brief introduction on how to get started bushwalking. Join me for future articles where we’ll explore more details about the amazing places you can go no matter your level of fitness or experience. And send me a message if there’s a particular question or topic about bushwalking that you’d like answered.

Daisy Spoke

Discovering mountain biking as life’s ultimate parallel universe in her middle age, Kathryn Walton shares information and reflections in ‘Daisy Spoke’ that inform, inspire and empower women to a healthy and active lifestyle.

Make it Happen! Actions to take you from surviving to thriving

Daisy Spoke Banner

From thriving to surviving and back again

For most of my life I’ve enjoyed the challenge of setting goals and making them happen. I’ve learned that the actions I choose can take me from surviving to thriving. I love to have a go at something new, especially adventurous activities. For a few years this seemed to slow down a bit. Perhaps it was my added commitment to my young family, our relocation to a rural area, or maybe even a simple ‘rut’ I got myself into. When life was more about surviving the usual (and not so usual) childhood illnesses, school assignments, getting the bills paid, and retrenchments, I often felt a long way from thriving.

Maybe it was my approaching middle age that brought along a renewed urge to live life as fully as possible. I know that I function at my best when I have a goal to aim for, and so when I began to focus on this aspect of myself again, I rediscovered my passion for adventure. Here I will share with you the actions that took me from surviving to thriving – you can do it too!

Goal-setting and problem-solving are key skills to success

The skills of setting goals and creatively problem-solving are key factors to success. Success doesn’t just happen. You have to create it, to action it, and to problem-solve it. It doesn’t always come easily, and we often shy away from the actions we need to take. We secretly keep our inner dreams to ourselves out of fear of failure.

Get your goal out there!

best things in life start with a dreamI’m sharing with you one of my goals that I’ve had floating about in my head for a long time. Putting it out there in the public arena is definitely not easy. I have a lot of doubts about whether I’ll succeed, but if I keep suppressing my dream, there won’t be any chance of success.  

Getting clear on my goal

I’m using the post 9 Steps to Achieving Your Dreams and Goals to help me get clear on just what it is I want to achieve, and why. This clarity will give me direction and motivation.

STEP 1 – IDENTIFY AN AREA FOR CHANGE

I want my life to be filled with adventurous activities instead of ho-hum routine.

STEP 2 – STAY FOCUSED ON THE CHANGE, DON’T BE DISTRACTED BY PROBLEMATIC THOUGHTS

There are plenty of problems associated with spending more time in adventurous activities. But when I’ve overcome them I’ll be living the life I want – full of activity, travel, inspiration, energy, feeling great! I’ll focus my attention on how I want it to be instead of what the problems are.

STEP 3 – SELECT YOUR SMART GOAL

I WILL GO ON AN OVERNIGHT HIKE  – something I haven’t done before!

Is it specific? YesAre my expectations realistic?

Is it measurable? Yes

Is it achievable? Yes, I’m comfortable and competent with bushwalking and camping, so the new challenge combines this with carrying my supplies.

Is it realistic? Yes, I’m reasonably fit, healthy, strong, sensible and organised. I’ll research and access resources and networks, borrow or buy equipment that I need.

Does it have a timeframe? I’ll avoid extreme weather conditions and give myself enough lead-in time to gather and test out equipment, do my research, and train to carry the weight of my pack. Spring will be an ideal season and I can select a date closer to the time based on weather and what suits my fellow hiker/s.

STEP 4 – WRITE IT DOWN!

Yep – here it is! In the public arena too! (Talk about pressure now!) But you don’t have to go public with your goal. There’s power in simply writing it down for your own reference.

STEP 5 – KNOW YOUR WHY! COMMITMENT NOT MOTIVATION!

I want to challenge the fears that limit me. I want to connect more closely with nature and discover my part in the world, learn to trust myself and stretch my limits, tap into my inner strength, develop self-reliance, and I want to finally use the backpack I bought years ago! When I feel unmotivated, I can look back at my “why” and stay committed to my goal.

STEP 6 – BREAK IT DOWN into steps
  • Research places, people, information, equipment
  • Talk to others who might like to share the adventure with me
  • Identify and collect equipment 
  • Trial various hiking foods and equipment
  • Go on training hikes with increasing distance and weight in back pack
  • Select a date (and a couple of back-up dates in case of adverse weather, sickness etc) and book campsites if necessary
STEP 7 – STEP INTO YOUR GOAL

I’ll take each step one at a time and gradually work my way towards an overnight hike.

STEP 8 – CREATIVELY PROBLEM-SOLVE ISSUES THAT ARISE

There are some predictable problems, and other new ones might arise. But I won’t give up – I’ll use the Creative Problem-solving Train (keep reading).

With any obstacle quote

STEP 9 – REWARD YOURSELF!

External rewards can be a blast, but that feeling of success I’ll have when I’ve achieved this goal – yeah, that – that’ll be my reward 🙂

6 steps to smash my goal usingThe Problem-solving Train’

Before I even get started, I’m thinking of all the ways that I could fail! So here I’m using the Problem-solving Train to anticipate and manage the obstacles.

STEP 1 – Probable, possible and unlikely problems

Is it probable? Is it possible" Is it unlikely?Probable problems: no toilets or showers, snakes, sore back and shoulders

Possible problems: hot weather, cold weather, rain, leeches, bush ticks, insufficient drinking water, equipment too heavy or too expensive, no child care, fire danger

Unlikely problems: I might be miserable, difficulty finding a suitable hiking buddy, sickness

STEP 2- choose one probable problem and brainstorm solutions

Probable problem #1: No toilets or showers

Brainstormed solutions: Hike near, and camp overnight at a site with facilities, read about and listen to podcasts about bush toilet hygiene, read stories of overnight hikers, hold on and avoid toileting as much as possible,  take a porta-loo, find out about toileting aids for bushwalkers, have a wash down or swim instead of a shower, avoid extremely hot weather, talk to experienced hikers about bush hygiene, remind myself that if others can do it so can I, think about how clean I’ll feel when I get to shower afterwards – WOW! There sure is a lot of possibilities here!

STEP 3 – pros and cons

Most of my brainstormed solutions are quite useful and viable, although I don’t think I’ll take a porta-loo (too heavy, smelly, awkward, embarrassing) and I don’t think it’s a good idea to avoid toileting (hmmm, that could be uncomfortable and bring on health problems).

STEP 4THE BEST OPTION/S

I think it’s best to deal with this problem from multiple angles so I’m going to include several action-based and mind-based strategies in my Plan of Action to deal with this problem.

STEP 5 – PLAN OF ACTION

What's my plan of action to deal with this issue?Choose a route and campsite for my first overnight hike that has facilities

Read about and listen to podcasts about bush toilet hygiene – this could come in handy someday even if I don’t need it this time!

Talk to experienced hikers about my plans including managing bush hygiene

Read stories written by overnight hikers

Find out about lightweight toileting aids for bushwalkers

Remind myself that if others can do it, so can I!

STEP 6 – REVIEW

Once I’ve actioned my plan I can review it, even before I go on my first overnight hike. Am IWell actually, yes I can! feeling more comfortable about the issue of toileting and showering on my overnight hike? Are there any new problems I need to address? I can go back to my other brainstormed solutions, or come up with new ones. I can flex my plans to help me achieve my goal instead of simply giving up. I can push through the discomfort of the plan not working out perfectly, and tap into my determined attitude to succeed.

Keep on solving!

Once I’ve got my plans in place for all the probable and possible problems I’ve identified, it’s full steam ahead. I’m already most of the way there! It’s in this phase of identifying and then creatively solving the problems that most people get stuck. It’s this process that makes the difference on the road to success. And for me personally, it’s an exciting ride moving from surviving to thriving, making my goal of living an adventurous life a reality instead of leaving it as a whimsical dream. Stay tuned for future updates as I smash this goal!

SMART Goals WorksheetFREE GIFT! To help you clarify and action YOUR goal (whether it’s big or small or anywhere in between), download your FREE printable Create Success With SMART Goals. This handy worksheet will step you through a simplified process to identify your S.M.A.R.T. goal, your “why”, the steps you need to take to achieve your goal, any problems that might get in the way of success, and creative solutions that will propel you towards success.

Click here to download your FREE printable “Create Success With SMART Goals” from the RESOURCES tab on my website, and check out the other printables and resources while you’re there!

Discovering mountain biking as life’s ultimate parallel universe in her middle age, Daisy Spoke aka Kathryn Walton logoKathryn Walton shares information and reflections in Daisy Spoke that connect, inspire and self-empower women to make healthy choices for themselves. She integrates her love of physical exercise, family, nature, gardening and creative arts with her professional background in mental health social work to facilitate change with individuals, groups and communities of women who are committed to living life to the full.